Maintenance Consolidate image database
In cases where the upload got stuck you may get an error message but can't tell how far the process got. Here you can check the consistency of image references in database and files found in the images folder of RSGallery2
This function checks the links of images between image files and database assignments. It finds left over items like orphaned files or database image reference with missing file
How to get there
In "control panel" select Maintenance

There select in section "Repair zone" the button "Consolidate image database".

This will lead to a page where it is checked whether there are database entries for missing images or for images with no database / gallery connection
Result of checks
On opening the form or clicking on "Repeat checking" the system is checked and the result is displayed.

In (1) appears the list of files with "missing parts".
(2) Area with filename and check box to select images for further actions -> (7)
(3) Area with state of image. On green the item exists an red it is missing
(4) Direct action buttons. On click the task is performed on the file of the rows
(5) The parent gallery of the file in the row is listed and one of the matching images is displayed
Area with state of image.

On green the item exists an red it is missing (1) Each column indicates a file missing or existing
For file origin folder see configuration settings
- Original folder: High resolution file. May be not saved on upload if prohibited in configuration
- Display folder: File with defined resolution on upload. It will be used in slide shows
- Thumb folder: Thumb size resolution files used in gallery view.
- Watermark folder: This column/files will only appear if this feature is activated in the configuration. The filename in the folder may not match the used filename in database or the other image folders
Direct action buttons

On click the task is performed on the file of the rows Similar to the button in the header area these button issue immediate task on the image references(items) of this row
(1) Create missing images in row
(2) Assign gallery name
(3) Repair all issues in row
(4) Remove items in rows
More detailed description can be found below when the list buttons are explained
Action buttons for selected images

The above buttons can be used for selected file lines
(1) Create database entries
- Adds database references to the selected files
(2) Create missing images
- Used the original or display image to create the missing ones. If only the thumbnail is given it is used also but the result may not be very bright.
(3) Create missing watermarks
- If watermark is selected in the configuration watermarked files are created for the selected files
(4) Assign gallery
- Above the file list on the right side a gallery can be selected. On clicking this button the selected files will be bound to the gallery
(5) Remove items in rows
- Does delete all existing connected items of the selected files. Deletes the references in the database and the existing files. Here all obsolete data may be cleaned.
(6) Repair all issues
- This button fixes all missing references. It creates database references and missing image files.
Assignment of image(s) to parent gallery

On the right side above the image list the user can define the parent gallery to be used in image action. The gallery can be assigned with a button "Assign gallery" within the image row or for all selected images with the similar button on top of the page.
If Button "Repair all" is clicked and a gallery is selected this gallery is assigned.
"Lost" database file references
If no files exists to a "lost" database item the result looks like following. 
In this case it is best to select the line and use button "Remove items in row" to delete this item in database.
Back door assignment of images to existing galleries
A indirect way to upload images to RSGallery2 is to copy of the image(s) to the RSGallery2 original folder. Go to "consolidate images" view.
1. Upload image
Copy your file per FTP into folder .../Joomla/images/rsgallery/original.
2. Create files and database reference

(1) Use button "Repeat checking" so the image is found
(2) If the image exists it is marked here
(3) If the image exists it is displayed here
(4) Select the parent gallery
(5) Select the line(s) with clicking on marker in front
(6) Use button "Repair all issues"
If all goes well then the line of the selected image(s) will disappear in the next display of the page
Maintenance Slideshow configuration
Slideshow parameters can be changed here
Two files living within the slideshow code define the parameters and their values
-
templateDetails.xml
Existing parameter and their default value are defined in section param.
-
params.ini
The actual values are taken from this file. If a value is not defined here than the default value will be used.
The format is parameter="value". The double quotes may be omitted
The slideshow code files reside in path on the server: ".../joomla/components/com_rsgallery2/templates/"
Path to edit configuration form
Goto maintenance -> Use button (1) Slideshow configuration

Slideshow edit configuration form

(1) Select the slideshow to edit
(2) Section slideshow parameter
The variables shown here are definitions for the slideshow prepared in Joomla edit format. These and their default value are defined in file templateDetails.xml in section "param".
On "Save parameter" all values are written into the params.ini file and will appear in below section
(3) Section slideshow file
The values in params.ini file set the actual used values and overwrite the default. Here the actual values are displayed in "INI" format. The format is parameter="value". The double quotes may be omitted. The values displayed are used when the slideshow is shown. If the file (text area) is empty then the standard values are used. The file is filled when the configuration parameters are saved. Lines with standard values are not needed and can be removed.
Save changes

The parameters may be saved by the buttons in the menu bar (1) or below the parameter area. (3)
The file area may be saved by the buttons in the menu bar (2) or below the parameter area. (4)
Tip:
Reset to default values
Delete the content of the file params.ini in the below section and save it (button in below section). Afterwards save the parameters (button in above section). All default settings will appear in file parameter definition area.
Maintenance functions
The maintenance form supports with sub forms several functions to check and repair the rsgallery2 image and database universe.
Each grey array is a button to click on. In most cases a sub form will open where more info or actions are provided
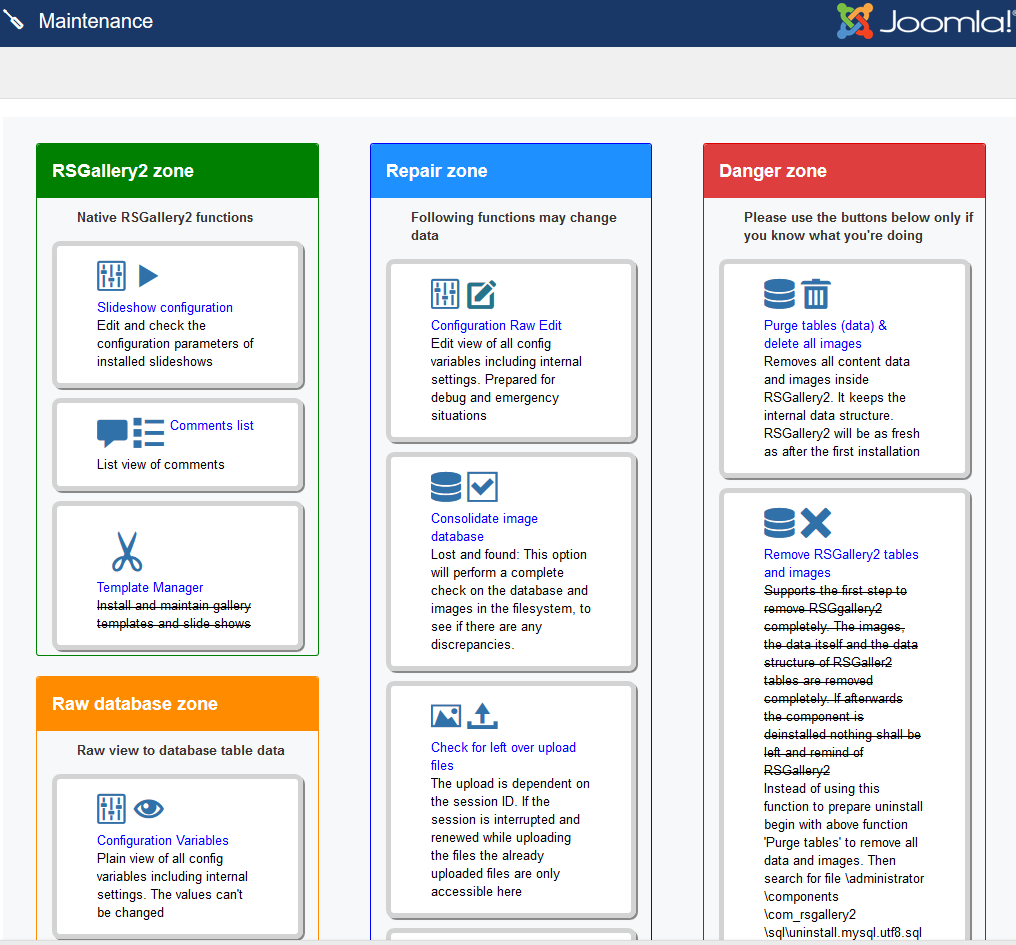
Zones
-
Rsgallery2 zone
Handles slideshows and templates
-
Repair zone
The image file system can be checked to match the database. Also the configuration can be checked here.
-
Danger zone
Delete database entries and database structure
-
Raw database zone
A window to the pure content of the database (lists)
-
Outdated zone
Door to old view of functions like image/galleries lists
-
Upgrade (from 1.x / 2.x) zone
Helpers after upgrading RSG2 from previous J!x versions
Rsgallery2 zone

(1) Slideshow configuration
Edit and check the configuration parameters of installed slideshows. Leads to a separate view for the edit of slideshow parameter.
See separate maintenance document ""
(2) Comments list
Enters list view of comments
(3) Template manager
Actually not working. (2014-2018)
In older version it had the function to upload slideshows and templates for the display of the gallery in frontend. These could be edited or deleted also.
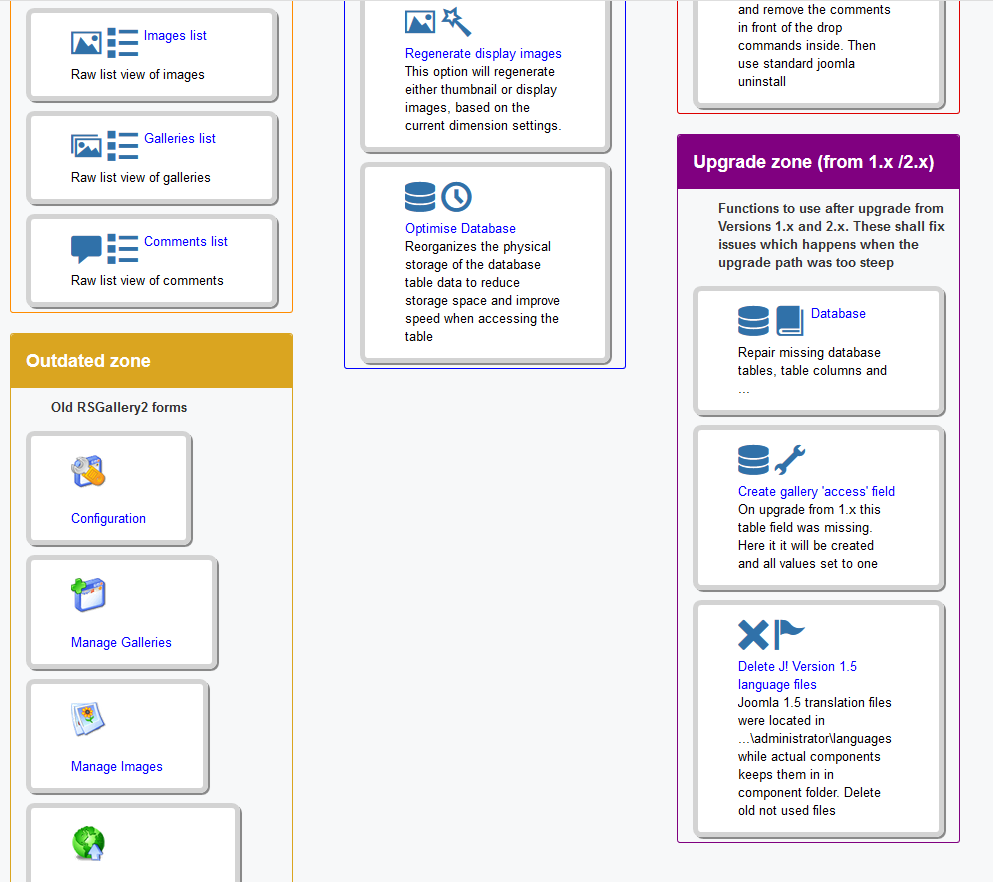
Repair zone
(1) Consolidate image database
The consistence of the database to image files can be checked here. The following view supports the check and repair of image orphans in database or as missing image files.
(See separate maintenance document "")
(2) Configuration Raw edit
Edit view of all config variables including internal settings. Prepared for debug and emergency situations. Lists all variables in alphabetical order. The values can be changed and saved.
(4) Regenerate display images
This option will regenerate either thumbnail or display images, based on the current configuration settings of thumbnail dimensions
(5) Optimize database
Reorganizes the physical storage of the database table data to reduce storage space and improve speed when accessing the table
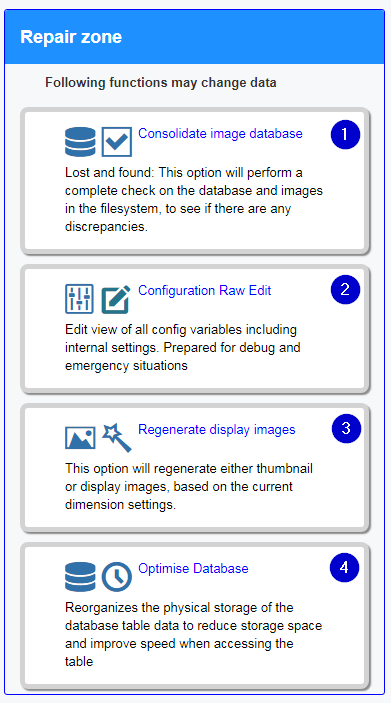
Danger zone
(1) Purge tables (data) & delete all images
Supports the first step to remove RSGgallery2 completely.
Therefore the content (items) in all RSGaller2 tables are removed. Additionally the image files are deleted. The data structure is kept but is empty.
This can also be used to purge the data and start again empty with new images and new galleries.
If afterwards the component is de installed nothing shall be left and remind of RSGallery2
(2) Remove RSGallery2 tables and images The previous intention was to support the uninstall that by removing databases tables and image files. The side effect of this function was that Joomla! did start with error and RSGallery2 could not be uninstalled
Instead of using this function begin with above function 'Purge tables (data)' See following instruction for a complete remove
How to remove RSGALLERY2 completely
(1) Use Maintenance -> Purge tables
This removes the database content and the image files
(2) Prepare the remove of database table structure
Search in admin rsgallery2 folder \administrator\components\com_rsgallery2\sql\ for file uninstall.mysql.utf8.sql. Edit the file and remove the comments in front of the drop commands.
(3) Standard uninstall
Use finally standard Joomla uninstall to get rid of all parts of RSGallery2
Raw database zone
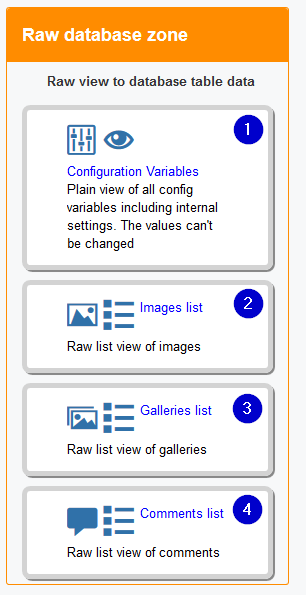
The buttons lead to the pure content view of the database lists
(1) Configuration variables
Shows a list with actual values of all configuration variables
(2) Images list
Shows a list with the database properties of all images. This contains more columns as the normal image view.
(3) Galleries list
Shows a list with the database properties of all galleries. This contains more columns as the normal image view.
(4) Comments list
Shows a list with the database properties of all comments. This contains more columns as the normal image view.
Outdated zone
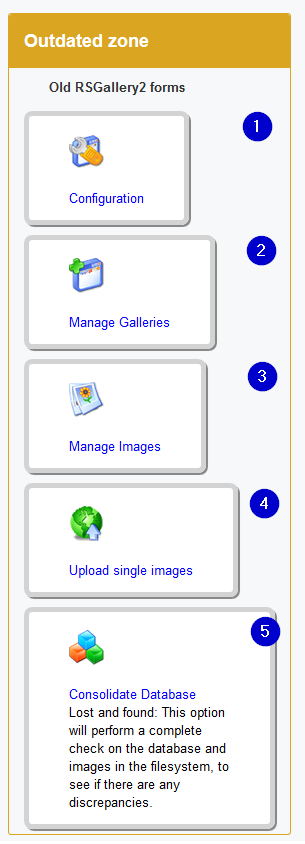
Door to old view of functions like image/galleries lists These buttons lead to the previous views of RSG2 around 2013 or beginning of J3x
the functionality is not granted as this old code is not maintained any more. Still it may be a hint what has improved over this time
(1) Configuration
%
(2) Mange galleries
%
(3) Manage images
%
(4) Upload single images
%
(5) Consolidate database
Don't use. It is only listed for completeness
Upgrade (from 1.x / 2.x) zone
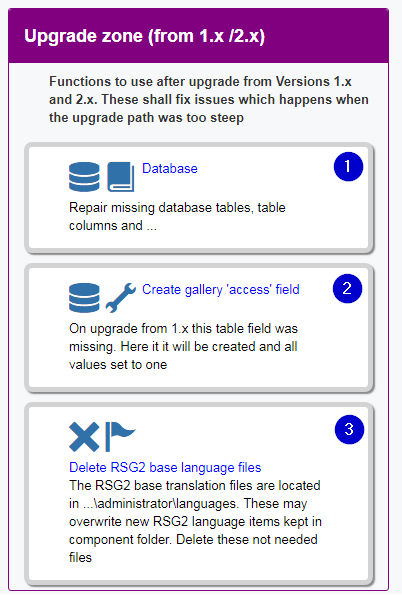
(1) Database
Repair missing database tables, table columns and ... This function reassigns the actual SQL definitions. Therefore new tables, new columns are added and not supported columns are removed
This is useful when upgrading from a real old version and general list can not be viewed
(2) Create gallery "access" field
On upgrade from 1.x this table field was missing. Here it will be created and all values set to one
(3) Delete RSG2 base language files
Deletes RSGallery2 languages files in joomla base language folders. The RSG2 base translation files are located in ...\administrator\languages. These may overwrite new RSG2 language items kept in component language folder.
Use this function when an update installation does not overwrite "old" base language files and translations do not appear or appear as old.